Showing posts with label tutorials. Show all posts

free quilt recipe: easy monogram baby quilt

It has been so long since I've sewn something--my best intentions to "sew something every month" have fallen by the wayside since I made that New Year's crafting goal. But when a dear friend requested something special for a newborn niece, I couldn't say no.


If you follow my Instagram feed, then you saw this quilt in progress last weekend. It came together super quickly--I pieced the top on a Friday, put the sandwich together on Sunday, and had the quilting done within four hours. With a sewn-on binding, this whole quilt took less than 12 hours. Ahhh, the speed of a crib-sized quilt with zero real piecing!

Hands down, this was the most successful and most "artistic" machine quilting I've ever done. The "M" is for Maeve. I started by taping out the M with washi tape (since that's what I had on hand). My plan was to quilt next to the washi tape, using it as my guide line. By pure luck I had picked a main fabric with a grid pattern--that helped a lot when mapping out the M. I measured the half-way point between my two vertical lines and used a ruler to eyeball equal angles on both sides. When I started quilting, the washi tape quickly detached. So I stopped and grabbed my disappearing ink embroidery pen and marked the corners of my M. Then I just used the pattern on the fabric as my guideline to create straight-ish lines. And breathed a HUGE sigh of relief when the first "M" was finished! From that point it was a lot less stressful, since I could follow my original M as my guideline. I alternated between approximately and 1/8" and 1/4" spacing for each subsequent line of the "M."

I've learned the hard way that if I don't record the details, I'll be sad later--little things like, how wide was that binding I cut? The fun part of this quilt was that it used stash fabrics--the zoo border fabric has been in my stash for almost ten years now.

Main background fabric: Heather Bailey Free Spirit fabrics, Nicey Jane Cherry Hop Dot (used approximately 1.25 yards)
Border strip fabric: Alexander Henry 2-D Zoo (used a little over 3/4 yard) 
Backing fabric: Heather Bailey Free Spirit fabrics, Nicey Jane Welcome Road (used approximately two yards)
Binding fabric: mystery hot pink and white polka dots (used approximately 1/2 yard)
Construction notes: Cut the border fabric into 7" strips. Cut binding fabric 3" wide. Used 1/2 inch seam allowances throughout. Quilted the M first, then did quilting around borders. Attached binding with 1/2" allowance from quilt edge (normally I attach at 1/4 inch allowance) with intention of wider visible binding on the front of the quilt. This did work, but left less material for sewing through on backside of quilt (and more stressful binding sewing). Next time will cut a wider binding (try 3.5 inch strip) if I attempt this again. 


christmas bow wreath tutorial


Remember when I mentioned last week that it looked like Christmas had exploded in our house? Well, it's still pretty much all over the place. Several years ago I made some cheap dollar store Christmas ornament wreaths (see tutorial here) that I loved, but have eventually worn out over the years. I've always admired Christmas bow wreaths and thought it would be a fitting replacement. So out came the glue gun!


This project was pretty straight forward. I kept the paper adhesive tags on the back of each bow, using them as my spot to put the hot glue. Then I slowly attached them on a wreath form, leaving the interior and exterior edges for last.


To make a loop to hang the wreath from, I wrapped some wire-edged ribbon I already had on hand around the wreath form and made a loop when tying it closed. Then I covered the ribbon with bows.


Ta da! Cheerful and catches the light nicely above my mantel!

christmas teacher bouquets!


Right now it looks like Christmas exploded in my house. We are decorated to the max, and then add to that Christmas ornament making, teacher presents, and classroom party gift bags! Yup, total explosion! Today I'm going to share what is starting to become a tradition for me--making a "bouquet" of flowers using dry erase markers (and this year, Elmer's glue bottles!). Super fun and unique for sure. (also relatively quick to pull together too, for anyone looking for last minute teacher present ideas!)


What you'll need:
1. One large pack of dry erase markers (or highlighters, Sharpies, anything you know your teacher uses!). This bouquet used a 12 pack of dry erase markers and a 8 pack of Sharpies. It looked pretty full with just the dry erase markers alone though!
2. A "vase." Last year I used an oversized mug, this year I used a popcorn tub container I found at Walmart.
3. Two sheets of tissue paper.
4. A disc of floral foam.
5. Floral arrangement picks.
6. Assorted colors of felt in floral colors.

Let's get started!
Step 1: Cut a square shaped piece of felt for your leaf layer.


Step 2: Fold the square in half and cut a slit large enough for your marker to fit through.


Step 3: For the leaf layer, I cut random jagged edges around. Then repeat Steps 1 & 2 to create the flower, but this time cutting petal like rounded shapes instead. My flowers are not perfect at all--I just eyeball it, and it turns out pretty cute once the whole thing is put together.

Step 4: Assemble the "flower" by slipping the flower onto your marker, followed by the leaf layer. Ta da! Cute, huh?

Step 5: Attach your disc of floral arrangement foam to the bottom of your "vase" using double-sided tape.


Step 6: Attach a floral pick to each flower, then insert into floral foam base.
 

Step 7: After you've filled your vase, slip tissue paper into the gaps around the edges.


Alternative version! This one I made for the teacher's assistant using Elmer's glue, since kindergartners aren't good at limiting glue usage and they are in constant need of more glue!


Have fun with it! I'm sure you could do this with a variety of school supplies.

framed earring display tutorial


So in addition to all my sewing and knitting this summer, I've had another goal that I've been feverishly working on: organizing the house. Part of it was motivated by necessity (e.g. I came back  from our big road trip out west with my late grandmother's china which needed a place in my kitchen display cabinet, hence forcing a purge/reorg there), part of it was things just driving me crazy. My jewelry organization tutorial is the result of the latter! I had been using two jewelry stands from Pottery Barn for at least eight years now, and they worked fine but not great. Add a little girl who wanted to "admire mama's sparklies" and it became a tangled mess! Every single time I looked at it it just bugged me, and this summer I finally decided to do something about it. One thing that always bothered me about the old jewelry stands was that pin back earrings got lost in the shuffle, since they rested in the trays. And I always seemed to not notice everything I had. So that was the first thing I wanted to correct: I wanted everything visible, so I could see my collection at a glance. I also wanted something that would look pleasing on the wall, so I knew I wanted something framed.


Supplies (for both projects):
  • 11 x 15 " open wood frame (Hobby Lobby)
  • 12 x 12 " burlap covered frame (only $4.97 at Walmart!)
  • one can of spray paint that coordinates with your home decor
  • one 12 x 12 " cork board tile for your pinback earring board
  • a package of screen door/window repair material (Lowe's)
  • staple gun
  • kitchen shears

How to Make Your Dangly Earring Display

Step one: cut a rectangle of screen door material that is approximately two inches or so larger than the actual opening of your open frame. I was able to easily cut my screen door material with good kitchen scissors. Be careful though: the cut edge of this material is sharp!


Step two: using your staple gun, carefully begin stapling the wire screen door mesh to the back of the frame. I started on one side, and then pulled tight to make the mesh taut when stapling the opposite side.

What your finished staple job will look like:


Step three: using your kitchen shears, trim off the excess wire screen door material.


Step four: start arranging your dangly earrings in a way that appeals to you!


Ta da!

How to Make Your Pinback Earring Display

Step one: unwrap the burlap off of your burlap covered frame. (holy cow, this was the biggest bang for my buck of the entire project--$5 for a 12 x 12 frame, plus the burlap material to cover the cork board!)


Step two: spray paint the frame your desired color and allow to dry fully.


Step three: Do an initial trim of the cork board tile to fit the interior opening of your frame. (but don't go too crazy trimming, you'll fine tune your fit in the next step. Gently wrap the burlap material around your cork board tile, but don't adhere it yet. You'll need to easily access the tile to do some trimming in the next step.

Step four: Wiggle your burlap-wrapped cork tile into the frame and test the fit. If you have sections that bow out from being too long, pull everything out and carefully shave off some more cork board to achieve a better fit. (this is honestly the trickiest part of this project)


Step five: Once you are happy with the fit, adhere the burlap to the back of the cork board tile. I just folded the excess material and pinned it, but you could use a spray adhesive for a neater finish. Now you're all set to add your earrings! (I put the earring backs in a tray in my jewelry box on another dresser)


 Ta da!


For those of you who are super observant and noticed the necklaces in the "before" picture, here's what I did to better store them. A shadow box! This one has a magnetized door, and I found it at Hobby Lobby (just wait for a 50% off sale or take one of their great coupons!). Needless to say, these display boards make me soooo much happier than my previous storage solution!


so simple sewn coaster tutorial


All this quilt business got me itching to whip-up one of my favorite instant-gratification sewing projects--coasters! Here's my recipe for making easy, attractive coasters ... they make a great hostess gift!


Step #1: Cut three 4.5-inch squares for each coaster (one square of batting, and two squares of  fabric). I prefer cotton batting for this project, and like to mix things up with more than one fabric.
 
 
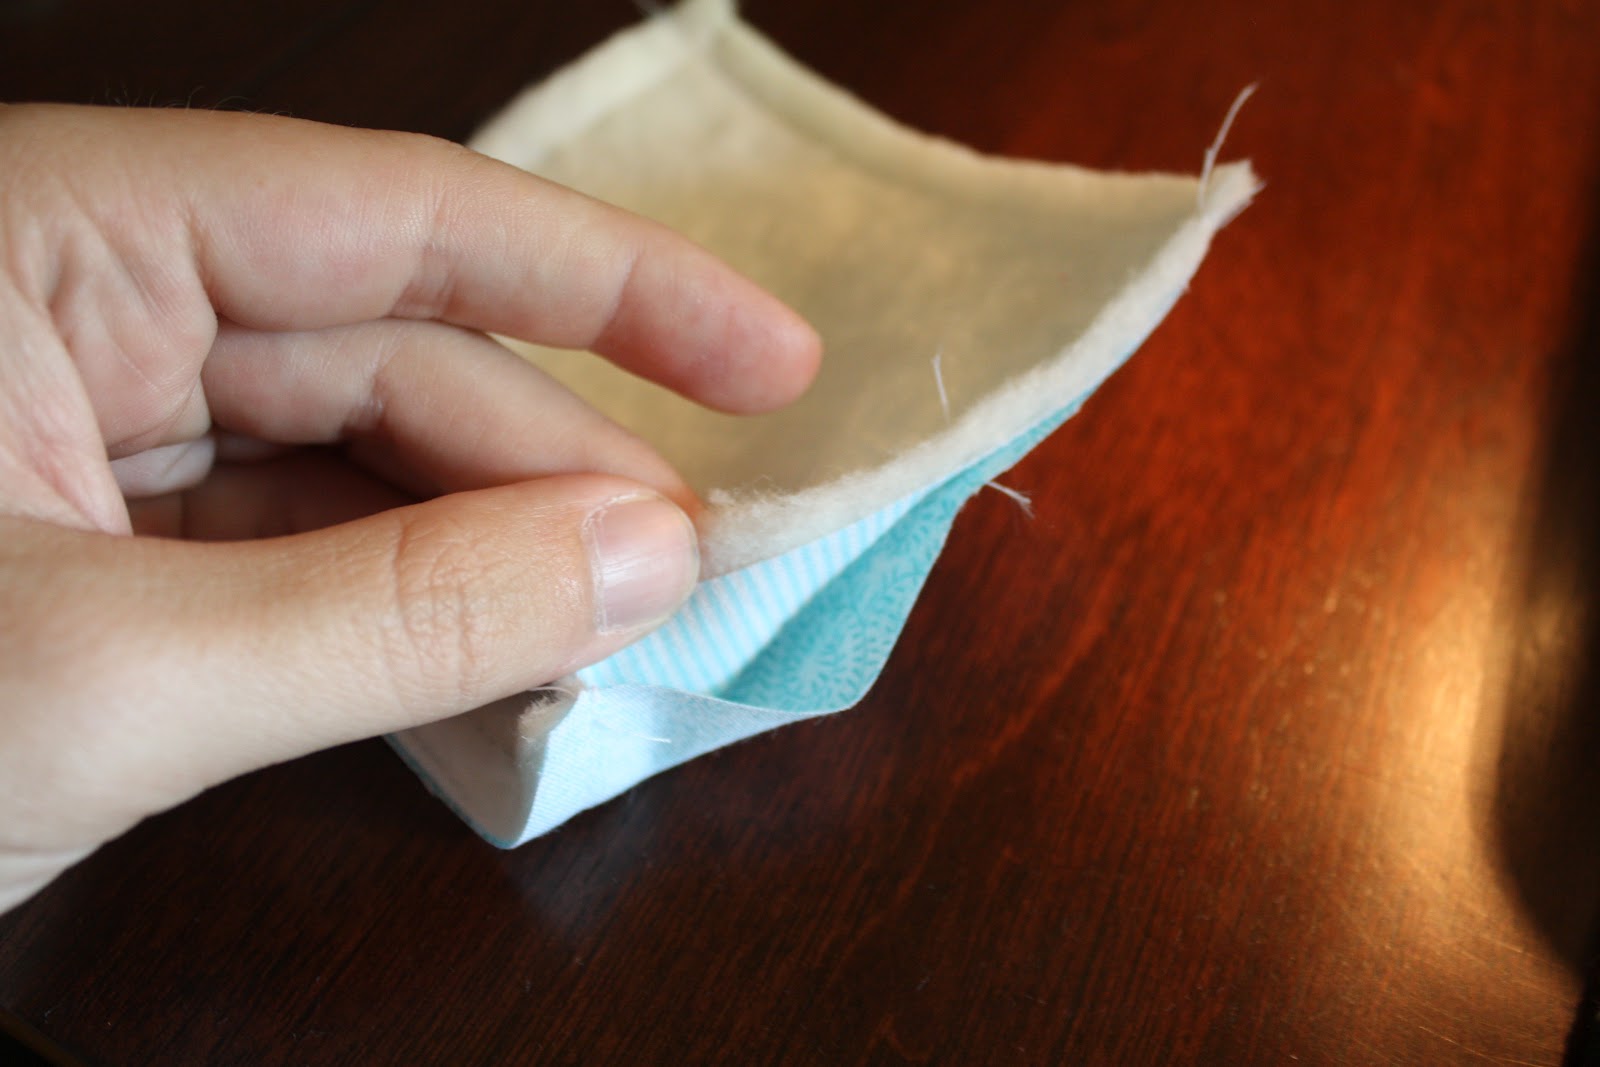
Step #2: Layer your two fabrics so that the right sides face each other (see above). Then layer your batting on top of that (see below).


Step #3: Sew around the perimeter using a 1/4 inch seam allowance. 


Step #3, continued: Be sure to leave an approximately 1.5 inch long gap in the middle of one of the four sides (in order to pull things right-side out). See below.


Step #4: Turn coaster right side out. Use a pencil or other pointed tip to push your corners out and square things up. Gently tuck the raw edges in around your gap (see below).


Step #5: Top-stitch approximately 1/8 of an inch from the edge around the perimeter of the coaster (this closes and secures the gap). Using your first top-stitching as a guide, stitch another interior square of top-stitching approximately 1/8 of an inch from the first line. Repeat an additional two times, or as desired.


Step #6: Enjoy your new coasters!

hello world, it's been awhile

      Wow. 16 years of fiber crafting statistics! This chart is deceptive because I only count "yards out" when the project is fin...