project/blog planner pages (free printable)

You may be surprised to read this, but my favorite knitting/craft tool actually is not a traditional crafting tool at all ... it's my planner! I know I'm not the only crafter who feels like they have attention-deficit disorder ... with Ravelry and an endless stream of books, magazines and online publications, we face a constant stream of new, shiny patterns calling "make me! make me!" wherever we turn. It's really hard for me to resist the lure of a new project ... so I typically alternate between periods of cast-on-itis and scrambling to finish some of the countless WIPs I have scattered around the house. But things this year have stayed more focused, and I have to credit my planner for that. I've found that I am sooo much more productive if I consciously think about what I want to achieve when I start each week. And if I devote a little time each day to a project, it's finished before I know it. Or even if I only devote one or two days a week to a long-term project! (just look at my Sunday's Stitches project for evidence of that!)

I've used planners for years to organize my school and work life, but this is the first year I've used one to tackle my current crafting projects and long-term crafting goals (and included in that is maintaining this blog, of course!). Since most planners are focused on managing daily schedules of meetings and appointments, I ended up creating a more project-based version. These have bigger boxes for listing tasks and planning for my projects, and smaller "days" where I can assign a task to each day if I like (like "write FO Friday blog post"). I tend to get stuck doing the little, mindless tasks and not leaving enough time for the bigger priorities--that's where the "top five to do" box comes in. It keeps me honest and visually reminds me of what the most important things I need to do are. Some months I'm more focused on one big project, and others I have multiple going ... so I made a couple of different versions. Feel free to download these and use them to organize your crafting life! They would work well for any project-based goals you may have--crafting, knitting, blogging, writing, whatever!


(click on the image to see larger, right click and "save as" to print and use!)


what's your color story?

Color is one of my favorite topics ... color is what attracts me to all the crafts I dabble in. I'm happy with the simplest of patterns as long as the color makes me happy! I thought about doing another infographic to see the patterns in my color choices, but instead I tried one of those free palette generators. First, I took a screen shot of my Ravelry projects page (with the screen size zoomed out to 50% to fit almost everything in!). Here is that image, broken into two parts: 


Then I dumped the image into Microsoft Paint and saved it as a .jpg. Next step? Upload the image into a palette generator! I used Palettefx.com, and it generated this palette from my Ravelry Projects page:


Pretty accurate, huh? At first I was surprised, because I feel like I choose brighter and bolder colors than this palette would suggest. More hot pinks, for example. But when I took a closer look at my projects page I realized my impression of my color choices was wrong. Now, the blues in the palette were not surprising at all. What was interesting to me is that I hadn't realized that I've used such a full range of shades/value among my blue projects. What I should do is take a picture of my stash and run another palette generator ...

facing a hard truth

I have a pattern problem. There, I said it. And the pictures prove it.


This is precisely why I started my love your library challenge this year. I was watching my books and magazines pile up, and I just knew I wasn't knitting enough from them. But I didn't actually sit down and do the math like this. And it's ... a little startling, to say the least.


I thought magazines were my biggest problem, but in reality the number of patterns in my book collection is pretty close. I was accurate in realizing that I rarely knit out of my magazines, however. A whopping two projects out of my magazines ... eeesh. I typically only purchase single patterns (e.g. PDFs) if I am about to immediately cast on for the project, so that's why that category has a much better completion rate. Magazines will always be an on-going problem for me, since I have so many subscriptions. I subscribe to Interweave Knits, Knitscene, KnitSimple, and Vogue Knitting. I know it would be smarter to only purchase the issues with patterns I want to knit in them, but I love getting magazines. It's a real treat for me to sit down, relax, and see what kind of patterns are in each issue. So I don't anticipate cancelling my subscriptions anytime soon ... must knit faster!


Looks like I'll be focusing my energy on knitting out of my magazines for the rest of this year!

P.S. For those of you who like the idea of the love your library challenge, feel free to join in! It's okay to start mid-year. Come back at the end of April to add a link to your monthly wrap-up/next month's goals blog post.

joining in ...


Are you participating in the 4th annual kniting and crochet blog week? I'm not as ambitious as last year, but I couldn't skip the fun! When Eskimimi posed the first topic I knew instantly which "house" I belonged to ... bee! I have described myself as having crafting ADD so many times ... as much as I love Ravelry, I struggle with how it enables my distraction issues. I enjoy the rush of planning and casting on for a new project ... about a third of the way in, the adrenaline usually fades and then it can become a slog (except when I have an exceptional pattern or yarn that keeps things interesting!). That's the real reason why you see so many quick knit projects on this blog ... they're the only ones that stand a fighting chance of not getting abandoned to my cast-onitis. Larger projects aren't hopeless, but they really need me to love them to keep from losing my interest, you know? If I make a mistake, or run into trouble with the pattern .... that can be a death sentence for that project ...

What motivates you to stay focused? Desire for the finished product? A deadline or expectations of a recipient? Guilt (e.g. I've spent _____ on the supplies for this ...)?

sunday's stitches

sunday's stitches: a moment to slow down and savor whatever your stitching on
 

The actual needlepoint: complete! Here you can see the power of backstitch. Without it, the white mare pretty much blends into the background. Now I'm embellishing the flowers with tons of tiny french knots. I'll be able to wrap this up by next Sunday for sure! You can view my progress from week to week here.

luuk


Now that I've used up my super bulky yarn stash, I've moved on to some Lion Brand Amazing (their color-changing yarn, a budget version of Noro but in acrylic, basically) I bought on impulse at my local Wal-Mart long ago. When I saw this pattern on Ravelry, it looked like so much fun I just had to try it! Another super speedy knit ... I may get addicted to knitting kid's hats, are they are sooo fast to work up!

Pattern: Luuk, in "Child" (size 20")
Yarn: Lion Brand Amazing (colorway: mauna loa , used approx. half a skein)
Needles: size 8
Mods: none!
Link to Ravelry project page.

I think my favorite part of this pattern is the bobble that tops the i-cord on top of the hat. This is the "small" bobble version. So stinkin' cute!


whipping up more one hour super bulky child's hats


I've been having fun stashbusting and whipping out more azalea hats (free child's hat pattern!) for the orphanage in Kenya ... remember that I promised to report back on whether or not you could yield two hats from one skein of Lion Brand Hometown USA? The answer is: nope. It takes about 2/3 a skein for one hat ... so you can yield three hats from two skeins, to be precise. I've also been experimenting with the finishing on this last set. I wanted to try a pom pom for this more "boy" color (Little Rock Granite) and below is the effect when you cast off instead of making the i-cord top.


One more to go! Then I will have officially depleted the Lion Brand Hometown USA left in my stash ...


sunday's stitches

sunday's stitches: a moment to slow down and savor whatever your stitching on


This is hard to believe ... I'm sooo close to finishing! Hard to imagine that a more than 15-year project is finally coming to a close! You can view my progress from week to week here. 

fingerless mitts and project bag

I participated in my very first Ravelry swap group this month--a birthday group, to be precise. Now that my partner has had her birthday and opened the goodies I sent her, I can finally post about these secret projects! First, these great garter stitch fingerless mitts. I used Ysolda Teague's pattern and loved every minute of making them! The yarn is Blue Moon Fiber Artists' Socks that Rock medium weight, an unknown colorway that was gifted to me by a good friend who is very anti-pink. (so anti-pink in fact, that I honestly have no idea how this skein came into her possession ...) It was my first time knitting with the yarn, and won't be my last! One word: yum.


There are several things that I love about this pattern. The garter stitch, of course! And an ingenious construction. You use a provisional cast on, so you end up kitchener-ing everything together so there is no seam to bug your hand! And you use a lot of short rows--to make the palm wider than the arm, and to create the thumb. Super speedy, too. I barely put a dent in the skein, so I'll be making more of these ... at least one pair, maybe two? We'll see ...
 

I also whipped up a little drawstring project bag, my first sewing project with a drawstring! Also the first time I actually made something I pinned on Pinterest, ha! (talk about rabbit hole ...) The bag was a little more fussy, but turned out well enough that I can see myself making more.
 

super bulky child hat knitting pattern (free!)


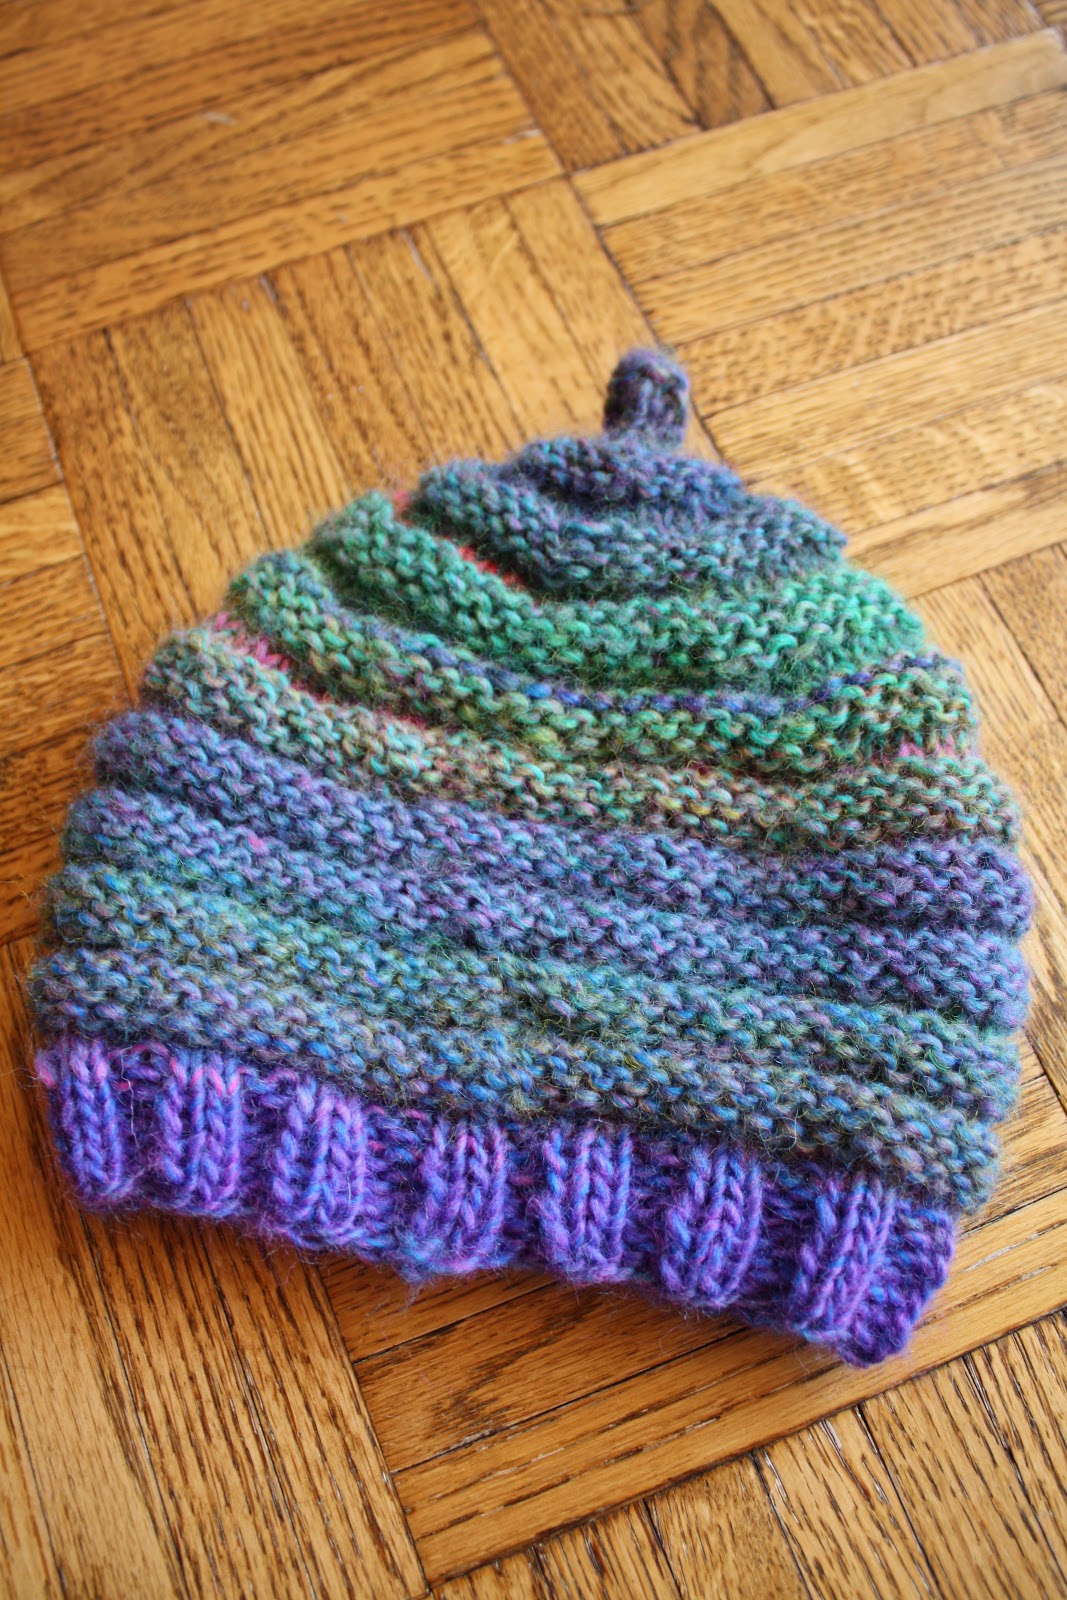
My knitting guild just started a new charity project, knitting hats for children living in an orphanage in a mountainous region of Kenya. I wanted a pattern that was super fast, super cute, and would work perfectly with the four skeins of Lion Brand Hometown USA yarn I had sitting in my stash. But everything I found on Ravelry was designed for adult-sized heads ... and all the patterns in my library were designed for DK or worsted weight yarn. So out of necessity I drafted up my own simple kid's hat pattern for super-bulky yarn. Given the coincidence that I knit this as our azaleas are starting to bloom using the "Phoenix Azalea" colorway, I'm calling this the "azalea hat."

Pattern name: Azalea Hat (Ravelry pattern page)

Finished dimensions:
16" circumference (unstretched)
Modeled on daughter's 18" head above.

Materials:
One skein Lion Brand Hometown USA (81 yards per skein; shown in "Phoenix Azalea")
Size 13 16" circular needle
Size 13 double-point needles
Stitch marker for marking the beginning of your round

Gauge: 2 stitches per inch

Instructions:
Cast on 36 stitches, join to knit in the round (placing marker to indicated beginning of round).

Row 1: K2, P2 until end
Continue in K2, P2 ribbing until knitting measures 2 inches.
Begin stockinette section.
Knit until hat measures 6 inches (including 2 inches of ribbing).

Begin decreases: *K5, K2tog* repeat until end of row, end with K1 (31 stitches remaining)
Next row: Switch to DPNs. *K4, K2tog* repeat until end of row, end with K1 (26 stitches remaining)
Next row: *K3, K2tog* repeat until end of row, end with K1 (21 stitches remaining)
Next row: *K2, K2tog* repeat until end of row, end with K1 (16 stitches remaining)
Next row: *K1, K2tog* repeat until end of row, end with K1 (11 stitches remaining)
Next row: *K2tog* repeat until end of row, end with k1 (6 stitches remaining)
Next row: *K2tog, K1* repeat until end of row (4 stitches remaining)

Begin i-cord to finish top of hat.
Place all four stitches on a single dpn, so that the yarn is attached to the stitch on last stitch on the far left. Knit 1 row. Begin next row as if to make i-cord, but bind off as you knit each stitch. 

Weave in ends and enjoy!

Alternate ending: if you don't like making i-cord, draw your yarn through the last four stitches to close top of hat. Top with a pom-pom or leave as is, whichever you prefer!


This picture doesn't quite show it, but I love how the decreases make a nice swirl at the top of the hat. I'm pretty sure you might be able to eeek out two hats from one skein ... I have cast on for another hat to test this theory and will report back!
 

sunday's stitches

sunday's stitches: a moment to slow down and savor whatever your stitching on


You can barely see the ballpoint pen guidelines I've added, but they are there! You can view my progress from week to week here.

dyeing yarn with easter egg dyes


I thought March was going to turn out to be a bust for the third month of my love your library challenge ... but then this weekend I found myself staring a lot a whole lot of extra Easter egg dyes and I remembered Pumpkin's little dyeing experiment. Dyeing is something I've want to try for a long time now ... and I have the books and skeins of Knit Picks "Bare" to prove it! So I busted out my two dyeing books and managed to squeak in a finished love your library project for March.

Now for the low-down on the books--they are both excellent and I highly recommend both. But for newbies like me, Gail Callahan's book is sooo much more approachable. She even has a chapter titled "If you can cook potatoes you can dye yarn." Talk about confidence booster! She has a nice set of beginner projects to get you started that includes one working with food coloring, so I based this project off those instructions. The "Teach Yourself Visually" book had better step-by-step photos, and instructions that were more detailed in many areas. So I'm glad I have both books, honestly. But the "Teach Yourself Visually" book assumes you have a full complement of the typical acid-dye process chemicals--which just added to the intimidation factor. Gail Callahan's book, on the other hand, only required that you have vinegar, some form of food coloring, and yarn/fiber to dye. Stuff that pretty much anyone would have in their kitchen!

This process is surprisingly easy:
  1. Wash your yarn/fiber (if necessary).
  2. Prepare your yarn/fiber by soaking in vinegar/water solution for 30 minutes prior to dyeing (1 part vinegar to 3 parts water).
  3. Apply your dye.
  4. Microwave (covered) for 2 minutes on high, let rest for 2 minutes, then microwave for 2 minutes on high again. (this "sets" your dye)
  5. Let yarn/fiber cool.
  6. Rinse yarn/fiber, and hang to dry.

This was my first attempt, which I like to call "franken-rainbow." Honestly, I didn't have a good plan when I started ... I had just finished dyeing Easter eggs with my daughter, and started with the leftovers. So you could argue that I didn't have full strength dye, since the eggs had used up some of it. I started by using an icing pen like a turkey baster and carefully applying blue, orange, and green in four-inch long segments. Then I didn't know what to do next, as I had used up all I had of those colors and had a lot more yarn to dye! So then I played around with dumping the red, orange, and yellow on in longer lateral stripes. It looked god-awful ugly at that point. So I set it aside, frustrated, and decided to be more purposeful with my color choices on my next skein.

For this skein, I opened up a new package of PAAS Easter egg dyes. This one was a Wal-Mart jumbo pack that came with more than the standard six tablets (red/pink, orange, yellow, green, blue, purple), giving you an extra blue, orange, and yellow. What I've learned from this project is that a single tablet of PAAS dye doesn't really go that far, honestly. You can see this above--the light purple is a single tablet. The blue is two tablets. And the darker purple? Kroger brand "neon" food coloring! In contrast, the food coloring was so much easier to work with in terms of making more saturated color. I was bad and didn't scientifically measure how many drops it took to mix this purple. I just squirted maybe half a teaspoon or so of food coloring and added approximately 10 oz. of water to a cup and poured onto the yarn until I had good coverage (no white spots). Since I had a bunch of leftover PAAS dye tablets, I mixed them up and went back to the Franken-Rainbow skein and touched up the colors where the saturation was lacking. I think that really made the difference--it took that skein from ugly to something I really love now! So if you plan to attempt this, be sure to get multiple PAAS boxes. It looks like having two dye tablets is a minimum for bright, happy colors (and that's for a single skein of Knit Picks Bare Stroll!).


Here you can see some white spots that still remain in my second attempt. I decided to leave them, since I didn't have a second purple dye tablet and I didn't want to mess with a colorway I really like despite the light coverage.


And here's a tiny bit of muddling that happened in my Franken Rainbow skein. Not as much muddling as I feared, given the haphazard way I was applying dye to this skein!

And a better, more color-accurate shot in better light. I am so thrilled with the results--now I have to decide what to attempt knitting with them! I'm very curious to see how they knit up ....

Was March a successful month for your personal love your library challenge?

2021 year in review

  Who would have thought that the second year of a pandemic would be worst than the first, in terms of crafting mojo? Not I. But this chart ...