welcoming home baby: party on your head hat


I just whipped up a stinkin' cute baby hat using the kit I bought waaay back in August last year when I visited Knit1 in Oxford on my yarn crawl across Mississippi. Unfortunately, the kit didn't identify the actual yarns included, but I suspect the purple wool is Malabrigo, I know the pink ruffle yarn is Cha-Cha, and I have no clue what the purpley-blue ribbon yarn could be ... any ideas? Regardless, I love the color combo! The kit included a pre-made pom pom, which even further sped up construction. It's a little bigger than I probably would have made it, but I like it. It seems to balance out the flouncy-ness of the Cha-Cha ruffles quite well ...


The pattern? It's the "Party on Your Head Hat" (don't you just love that name?) that is the depicted on the cover of Welcoming Home Baby by Tricia Drake (see my Ravelry project details).


The book is full of fun, quick knit hats, baby blankets and those "cocoons" that have become trendy for baby announcement glamour photo shoots. Personally, the cocoons kind of freak me out (I can't stop myself from thinking about suffocation) and I don't see the point of knitting something that will be used once as a prop in a photo shoot ... but that's just me. For me, the hats and the blankets make this book a worthwhile purchase alone. One word of warning, though ... this author likes the good stuff when it comes to yarn. These projects all use pretty high-end luxury yarns that frankly, are not practical at all (unless you are willing to handwash like crazy!). I'm not sure how easily you could make substitions, either, since most of the designs hinge upon the unique qualities of these yarns. So these projects aren't necessarily intended for heavy everyday use and the dirt, stains, spit-up, etc. that would come with that. But if you love using nice yarns and want to make something spectacular as an extra special gift for that new one, this book is perfect.

the first of the tiny sweaters

I'm plugging away on the "Petite Facile Pullover" from the Winter 2011 issue of Interweave Knits. It's got an unusual construction method, which I'm enjoying. You're looking at the back of the sweater, plus the back of both arms. Next I'll go over each shoulder to knit the front. Basically, I'll end up seaming the sides and the bottom of each arm. The yarn is one of my favorites, Miss Babs Yummy Handpainted Superwash in the "Forest Afternoon" colorway. It's hard to capture the depth of this yarn in photos ... think mostly green, with intermittent pops of blue and camo taupe.

I would have never considered knitting this pattern if it hadn't been a recent post about it by Grumperina ... it seemed completely un-noteworthy when I received that issue of Interweave Knits. Maybe because the white yarn doesn't highlight the yummy garter yoke well (see below)?

It's knitting up super fast, so hopefully I'll have this in "finished object" territory soon!

cozy cables

The Shadow Cable Baby Blanket is done! I ended up using seven skeins, as I predicted. The final dimensions? 36 inches wide by 39 inches long. Each skein added about 5.5 inches of length. I underestimated how hard this yarn was on my hands ... now that I've switched back to knitting with wool, I can tell a major difference. But frankly, I'm normally too impatient to knit something as big as a blanket. So for me, the tradeoff of tired wrists in exchange for super-fast speed was worth it (super bulky yarn + size 11 needles = awesome). My only other quibble with this yarn was the number of knots ... each skein had at least one knot, and my first skein had a whopping four knots! But given how uber-soft this yarn is, I'd use it again. I'm really loving the cables ... I don't think I'd like this yarn that much in straight stockinette. The seed stitch border looks great, too. But I don't think I could handle knitting an entire blanket in seed stitch! For more details, see my Ravelry project page.

skirting the issue


I just finished the bed skirt for bambino #2's crib ... one more nursery prep item done! I am totally into a good zig-zag stripe right now, can you tell? I used the Vogue 7245 pattern (lots of great nursery items on that one!), and approximately 3 yards of fabric (more than called for since I wanted to match up the zig zag). My only quibble with this pattern is that if you followed the given dimensions, your crib skirt will end up too big. Instead, I lay out my "base" fabric on the actual mattress to ensure my dimensions are correct. Other than that, super easy and fast project!

five-year blogiversary


It all started with a felted flamingo ... what a crazy way to start my foray into the crafting blogosphere, huh? I can hardly believe it's been five years. I thought I'd take a look back over the years to celebrate.

It's interesting to see how my crafting techniques and interests have progressed over the years. In the early years, my knitting obsession was felted bags and baby blankets. Not surprising, given that was my comfort zone at the time. My very first knitted project was the classic newbie project--a garter stitch scarf. My first "real" project after that was baby blankets for my friends and co-workers. Felting was my first venture into more complicated knitting techniques, like decreasing and increasing and knitting in the round. I definitely had plenty of hits and misses!

the pink dottie tote, one of my successes

This blog's early years are also dominated by another one of my favorite crafts, beading and jewelry making. I still make jewelry, but with a curious toddler around, beading is much more difficult (I can already envision someone dumping millions of tiny sead beeds on the floor) and my jewelry making has diminished a bit in the past two years.


I've knitted my first cardigan, cables, colorwork, socks, mittens, and lace ... and had plenty of flops as I struggled to learn about ease and fit in my first few knitted garments.

coronet, my first cable project

Sewed my first quilt, and then went on to make another and another and another and another...

my first (and so far only!) king-sized quilt

Thanks to a great sewing class at my local (but now closed) fabric shop, my sewing confidence grew by leaps and bounds ... starting with simple tote bags and progressing to placemats, tablecloths, and making my own laundry hamper liners ...


Documented our cross-country move from the Washington state to Mississippi ...

Published a simple garter-stitch scarf pattern and my first felted tote pattern ...

the Tapered Tote pattern

Made jewelry out of pop cans ...

Participated in my first craft fair ...

Kid's lion scarf.

Earned a reader's choice Blue Ribbon Blogger award from Country Living magazine ...

And took lots of pretty flower pictures ... apparently my favorites are dahlias, daffodils, lilies, and tulips ...


It's been a wild, fun ride ... I'm so excited to see what the next five years will bring!

getting cross-eyed


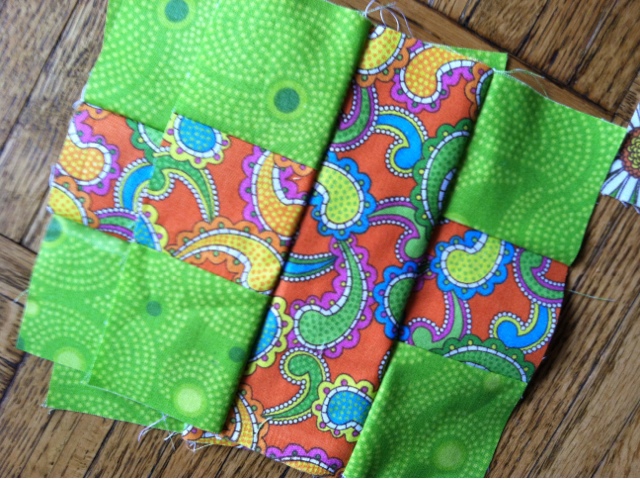
Remember my dilemma? Well, as you can see, I ended up going with crosses ... these are just a few of the blocks I've created so far with my jelly roll. My jelly roll has a bunch of greens, blues, oranges, and pinks. I'm trying to mix more "solids" with the crazy patterns to ensure there is enough contrast for the crosses to show up. Unfortunately that doesn't make for that many color combos, so I might end up getting a few more fabrics to add to the mix. It will definitely make for a scrappy, cheerful quilt, that's for sure!

Note: I apologize for the slight blur in these photos ... this is my first time experimenting with blogging with my fancy-shmancy new smartphone. I'm a late adopter. :)


Don't forget to check out the rest of the great works-in-progress at TamisAmis!

easy felt heart garland

Happy Valentine's day! I have to admit, I got used to having garlands decorating my kitchen windows over Christmas, and they've felt bare ever since ... Valentine's day was the perfect excuse to create a new garland! This is a very easy, low-key hand-sewing project. The most work intensive part is cutting out all your hearts! If you'd like to make your own garland, here are my project notes:
  • I traced two heart-shaped cookie cutters to make my "pattern." (the large one was approximately 4.5" wide, the small one was approximately 2" wide)
  • I added a rectangular "tab" to the left side of the large heart pattern for attaching each heart to each other (see photos below).
  • To make one garland, I ended up needing 11 large hearts to stretch across the length of my windows. (note: leave the "tab" off your first heart in the chain. So you'll need 10 hearts with tabs, one heart without). You'll also need 11 small hearts.
  • I alternated red and white hearts with contrasting color small hearts, but this would look great in other patterns (two red, one white). This would look really cute in bright pinks, oranges, and lime colors!
  • I ended up using five sheets of 9x11 felt per color to create TWO garlands.
Here's how I fit my patterns on each sheet, for minimal waste.


Now, how to connect each heart ... basically, I made my "tabs" long enough that the stitches I used to sew two hearts together would be covered up by the contrasting color small heart on top. So you'll want to sew as close to the end of the "tab" as possible to make that happen. Use embroidery thread that matches the color of the heart that is on top (the red heart in the pictures below), and then even if your small heart doesn't cover all of your stitches, it won't matter since they'll blend in.


Now, place your small contrasting color heart on top, and hand-stitch it to the large heart using a contrasting color embroidery thread! I wasn't too picky about alignment, I just eyeballed it, using the "points" of the heart as my guide for lining things up.

Finally, cut two skinny (approximately 1/2 inch wide) strips of felt that are approximately 8 inches long. Fold in half, and sew to the ends of your garland to use for hanging!

So cute, huh? I think I'll be keeping this up all week!


cable crazy

Here's my latest project ... remember how I mentioned that you'd start to see some cute, tiny baby knitting projects on my blog? Well, here's one of the first ... a big, chunky cabled baby blanket using the aptly named Bernat Baby Blanket (colorway: baby blue). How can I describe this yarn? It's ultra bulky weight (knits up fast!), super soft, and squishy. Very chenille-like. It basically feels like yarn made out of a fluffy robe. But it doesn't have much give/stretch, so it does make my hands tired (similar to knitting with cotton). But given how fast it knits up and how soooooft it feels, I am pretty much in love with it.


The pattern? The "Shadow Cable Baby Blanket," a free pattern from Bernat (Ravelry link). It's a super simple, easy pattern. You basically knit stockinette for three rows, then have a cable row, and repeat. So far I've been able to cable without a cable needle (a first for me!) which has sped things up. The pattern calls for size 11 needles, which also ups the speed factor. The texture the cables are adding is awesome ...


So far I've knit up three balls. The pattern calls for six, but that would be kind of a wimpy blanket size to me, so I'll probably knit up seven. We'll see ...

pinwheels or crosses?

There's something about getting my sewing machine out that is addictive. After making one quilt, I immediately want to begin another. Luckily, I have a twin bed in need of a quilt and some cute jelly rolls patiently waiting for me to put them to use ... so now the question is, what pattern to make? I've never made a "jelly roll" quilt before, so I started with a quick Google search and quickly discovered that a lot of the eye candy I was finding all came from the same source: the Moda Bake Shop. OMG .... if you sew, this is your fair warning ... do not visit this site!!! Not unless you want to add a ton of projects to your must-make-now list ... soo many cute tutorials, sooo many cute free patterns!

These quilts are the top contenders in my search for a great pattern ... the difficulty level increases as the list progresses, and considering my pregnancy fatigue I'll most likely stick with something that is as simple as possible. So I'm pretty sure I'll be deciding between pinwheels (the Cartwheels Quilt) or crosses (the Positively Perfect Nap Quilt), but I really love all the beauties in this list ...

Positively Perfect Nap Quilt, by April Rosenthal of Prairie Grass Patterns.


Cartwheels Quilt, by Amanda Jean of Crazy Mom Quilts.


Avignon Picnic, by Andrea of Millions of Thoughts.

Cross Terrain, by Lee from Freshly Pieced.

Eli's Wheels, by Mary at the Tulip Patch.

Which would you choose?

baby boy fat quarter quilt

One nursery project done! I am so glad I used flannel ... it's soooo soft. Between two layers of flannel and a nice cotton quilt batting, this sucker will be toasty too. A few things I want to remember in case I replicate this quilt again:


  • This project used eight fat quarters of flannel fabric. I ended up cutting 5" by 5" squares, which produced 12 squares out of each fat quarter. I used a 1/4" seam allowance, so the final size of each square was 4.75 x 4.75 inches (96 total squares).

  • I ended up adding a 3.5 inch border around all sides of the top (3.25 inches after seam allowance). With this size, I was able to fit the quilt top onto my flannel backing without sewing any additional width onto the backing, and it also fit onto a standard crib quilt batting with no problem. I probably could have gotten away with a 4 inch border with no problems, but it would have been a tighter squeeze.

  • I really needed less than three yards of material for the backing AND the border.

  • I really needed less than 1.5 yards of material for the binding.

12 Socks in 2012: Pair #2

Moving on to pair number two ... this is the beginning of "Devon" from Cookie A's Sock Innovations book (I'm soo excited to finally be knitting a pattern out of this book!). The yarn? The lovely Miss Babs in the "Dahlia" colorway ... it appears more peach in this picture, and is a more pinky-peach in real-life. Very springy!

hello world, it's been awhile

      Wow. 16 years of fiber crafting statistics! This chart is deceptive because I only count "yards out" when the project is fin...